
Temporary URL for subdomain / การเข้าใช้ URL ชั่วคราวสำหรับซับโดเมน
For subdomains that you create, there is no temporary link by default but you can follow these 2 options you can choose
A. Client can add DNS and point subdomain to us B. You can contact support team to create temporary url for subdomain
To create sub-domain and add DNS to point to us
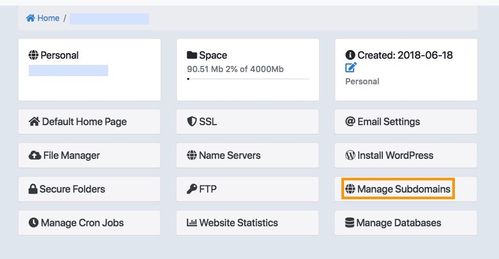
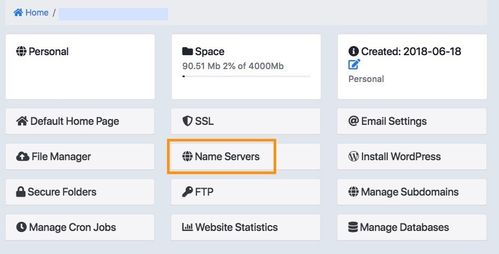
- Login to your Control Panel (my.codeorange.co.th) and click at "Manage Subdomains”
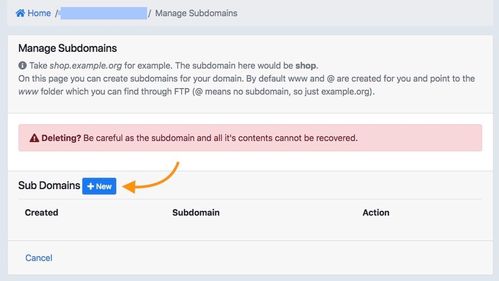
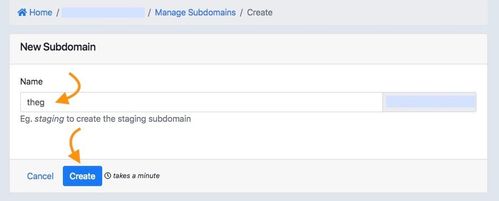
- Click "New" to create your subdomains name then click at “Create"
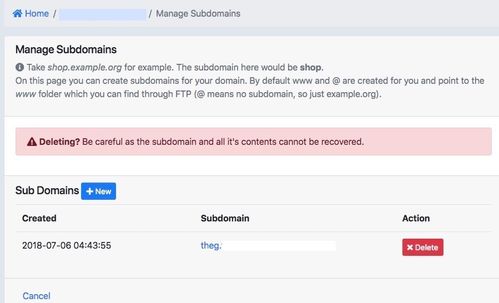
- Your sub-domains created, make sure that the right subdomains name you want to use
- Now to back to main menu in Control Panel and click "Name Server”
- Choose your sub-domains name and click "Edit"
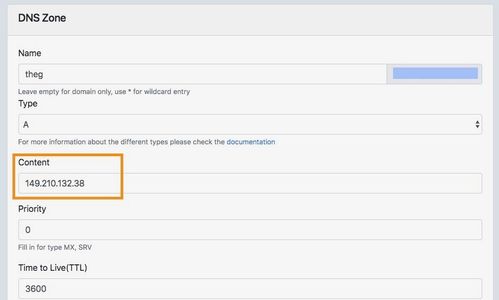
- Update DNS at your domain/DNS provider (if you don't know the hosting IP you can request IP via support team) then click "Update"
- Now your temporary URL of the subdomains that you created is ready to use
You can follow these step with screenshot below:
1. Login to your Control Panel and click at "Manage Subdomains"
2. Click "New" to create your subdomains name then click at "New"
3. Your subdomains created, make sure that the right subdomains name you want to use
4. Now to back to main menu in Control Panel and click "Name Server"
5. Choose your subdomains name and click "Edit"
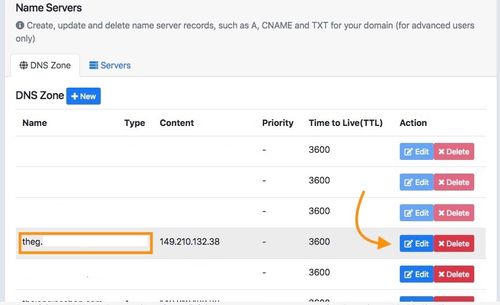
6. update DNS at your domain/DNS provider (if you don't know the hosting IP you can request IP via support team) then click "Update"
Now your temporary URL of the sub-domains that you created is ready to use
สำหรับภาษาไทยดังนี้
การสร้างซับโดเมน จะไม่มี URL ชั่วคราวสำหรับเข้าใช้งานซับโดเมนที่สร้างขึ้น หากท่านต้องการใช้งานสามารถทำตามตัวเลือกสองวิธีได้ดังนี้
A. สร้าง DNS แล้วชี้ซับโดเมนมายังหมายเลขไอพีของเรา
B. ติดต่อทีมซัพพอร์ตเพื่อขอสร้าง URL ชั่วคราวสำหรับเข้าใช้งานซับโดเมน
สำหรับการสร้างซับโดเมนและชี้หมายเลขไอพีมายังเซิร์ฟเวอร์ของเราสามารถทำได้ดังนี้
- เข้าสู่ระบบ Control Panel (my.codeorange.co.th) เลือกที่ “Manage Subdomains”
- คลิก “New” เพื่อตั้งชื่อ Subdomains ตามที่ต้องการแล้วคลิก “Create”
- หลังจากซับโดเมนถูกสร้างขึ้นแล้ว กรุณาตรวจสอบชื่อซับโดเมนให้ถูกต้อง
- กลับไปยังหน้าหลักใน Control Panel คลิกเลือก “Name Server”
- เลือกที่ซับโดเมนที่สร้างไว้แล้วคลิกที่ “Edit”
- ใส่หมายเลขไอพีของเซิร์ฟเวอร์ที่ท่านใช้บริการ (หากไม่ทราบหมายเลขไอพีสามารถสอบถามได้ทางฝ่ายซัพพอร์ต) หลังจากนั้นคลิก “Update”
- URL ชั่วคราวสำหรับซับโดเมนสามารถใช้งานได้ทันที
หรือสามารถทำตามรูปภาพทางด้านล่าง
1.เข้าสู่ระบบ Control Panel เลือกที่ “Manage Subdomains”
2. คลิก “New” เพื่อตั้งชื่อ Subdomains ตามที่ต้องการแล้วคลิก “New”
3. หลังจากซับโดเมนถูกสร้างขึ้นแล้วกรุณาตรวจสอบชื่อซับโดเมนให้ถูกต้อง
4. กลับไปยังหน้าหลักใน Control Panel คลิกเลือก “Name Server”
5. เลือกที่ซับโดเมนที่สร้างไว้แล้วคลิกที่ “Edit”
6. ใส่หมายเลขไอพีของเซิร์ฟเวอร์ที่ท่านใช้บริการ (หากไม่ทราบหมายเลขไอพีสามารถสอบถามได้ทางฝ่ายซัพพอร์ต) หลังจากนั้นคลิก “Update”
7. URL ชั่วคราวสำหรับซับโดเมนสามารถใช้งานได้ทันที