Set up email in Apple Mail / การตั้งค่าอีเมลใน Apple Mail

This article explains step by step how to configure an e-mail account in Apple Mail . The steps are explained by means of screenshots.

Required data

After you have created an e-mail address in the CodeOrange Control Panel (my.codeorange.co.th) , you can then use this information to set up your Apple Mail to receive e-mail.

Note: If you do set our SMTP server, but do not set a username and password for "outgoing e-mail", you will receive an error message: "Relay Access Denied".
The server name for your domain can be found by  re-storing the data of an e-mailbox in the  Control Panel (without changes). Then you will see all the data including the server name.
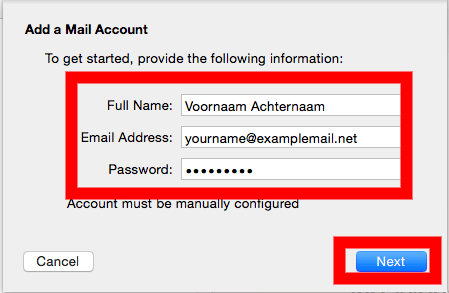
Required information: Before you follow the steps, it is important that you have the following information at hand (which will be shown after you have created your address);
  1. E-mail address;
  2. E-mail username;
  3. E-mail password;
  4. Incoming mail server;
  5. Imap or POP3;
  6. Outgoing mail server
  7. Port
Set up e-mail account step by step
Step 1: Open Apple Mail and choose " Add Account ";
Set up Apple Mail
Step 2: You can now add an email account. Choose " Add Other Mail Account " and then choose " Continue "
Set up Apple Mail
Step 3: In the next screen you can enter your "Full Name", the "email address" and the corresponding password. Click on Sign In to continue.
Set up Apple Mail

Step 4: You will first see that Mac Mail could not automatically configure / verify your account
After completing the above data, you will enter the screen below and you will have to fill in some fields.

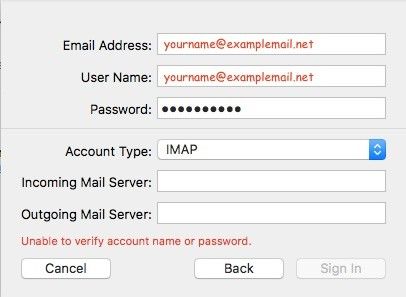
Account Type:IMAP: The e-mail stays on the server so you can access it from multiple devices (recommended)

Pop: The e-mail is forwarded to your device. Does not remain on the server.

Username: make it the same as the Email address field above it.
Incoming Mail Server: <SERVER> .codeorange.host (see settings overview Control Panel)
Outgoing Mail Server: <SERVER> .codeorange.host (see settings overview Control Panel)
Now click on Sign In.
You now receive a notification that the information could not be verified. Click on Sign In again to complete the creation.
Step 7 : If you have successfully completed all steps. You will see the screen below.
Set up Apple Mail
As you can see in the above example, you immediately receive a new e-mail stating that your e-mail account has been created.
You can now receive mail.

สำหรับภาษาไทยดังนี้

บทความนี้เป็นการอธิบายวิธีการตั้งค่าบัญชีผู้ใช้อีเมลใน Apple Mail โดยมีวิธีการตั้งค่าพร้อมรูปภาพดังนี้

ข้อมูลที่ต้องการ

หลังจากที่ท่านได้ทำการสร้างอีเมลใน CodeOrange Control Panel (my.codeorange.co.th) แล้ว ท่านสามารถใช้ข้อมูลนี้ในการตั้งค่าใน Apple Mail เพื่อให้สามารถใช้งานอีเมลได้

โปรดทราบ : หากท่านทำการตั้งค่า SMTP Server ของเราแล้ว แต่ไม่ได้ตั้งค่า Username และ Password สำหรับกล่องอีเมลส่งออก ท่านจะได้รับข้อความ error ว่า Relay Access Denied
ชื่อเซิร์ฟเวอร์ของโดเมนของท่าน สามารถหาได้ด้วยการ re-storing ข้อมูลในกล่องอีเมลใน Control Panel (my.codeorange.co.th) ท่านจะเห็นข้อมูลทั้งหมดรวมถึงชื่อเซิร์ฟเวอร์ด้วย
ข้อมูลที่ท่านควรเตรียมให้พร้อมก่อนเริ่มการตั้งค่า
   1. ที่อยู่อีเมล
   2. บัญชีผู้ใช้ของอีเมล
   3. รหัสผ่านของอีเมล
   4. ชื่อเซิร์ฟเวอร์ของอีเมลขาเข้า
   5. Imap หรือ POP3
   6. ชื่อเซิร์ฟเวอร์ของอีเมลขาออก
   7. Port
ขั้นตอนการตั้งค่าบัญชีอีเมล
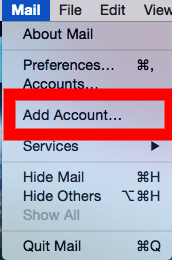
ขั้นตอนที่ 1 : เปิด Apple Mail และทำการเลือก "Add Account"
Set up Apple Mail
ขั้นตอนที่ 2 : ทำการเพิ่มอีเมล Account โดยการเลือก "Add Other Mail Account" และทำการเลือก "Continue"
Set up Apple Mail
ขั้นตอนที่ 3 : กรอกข้อมูล "ชื่อและนามสกุล" ตามด้วย "ชื่ออีเมล" และ "รหัสผ่าน" หลังจากนั้นเลือก "Next" เพื่อไปขั้นตอนถัดไป
Set up Apple Mail
ขั้นตอนที่ 4 : ท่านจะเห็นว่า Mac เมลไม่ได้ทำการตั้งค่าโดยอัตโนมัติ หรือตรวจสอบบัญชีผู้ใช้
หลังจากเสร็จขั้นตอนข้างต้นแล้ว ท่านจะเห็นข้อมูลที่ทำการกรอกไปในขั้นตอนแรกและท่านต้องทำการกรอกข้อมูลเพิ่มดังนี้
Account Type:IMAP: ให้อีเมลอยู่บนเซิร์ฟเวอร์ ท่านจะสามารถเข้าใช้งานได้จากหลายอุปกรณ์ (แนะนำให้เลือกชนิดนี้)

Pop: อีเมลจะถูกส่งไปยังอุปกรณ์การเข้าใช้งานของท่าน ไม่ได้อยู่บนเซิร์ฟเวอร์ใดเซิร์ฟเวอร์หนึ่ง

Username : ใช้ชื่อเดียวกับอีเมลด้านบน

Incoming Mail Server: <SERVER> .codeorange.host (ดูรายละเอียดการตั้งค่าได้ที่ Control Panel)
Outgoing Mail Server: <SERVER> .codeorange.host (ดูรายละเอียดการตั้งค่าได้ที่ Control Panel)

หลังจากนั้นให้ทำการเลือกที่ "Sign In."
หากท่านได้รับข้อความแจ้งเตือนว่าข้อมูลของท่านยังไม่ถูกยืนยันให้ทำการเลือก "Sign In" อีกครั้งเพื่อจบการตั้งค่า
ขั้นตอนที่ 7 : หากการตั้งค่าถูกต้องเรียบร้อยหน้าจอจะแสดงดังรูปภาพนี้
Set up Apple Mail
ดังภาพข้างต้น ท่านจะได้รับอีเมลแจ้งเตือนว่าท่านได้ทำการสร้างอีเมลเรียบร้อยแล้ว
หลังจากนั้นท่านสามารถใช้งานอีเมลได้
Did this answer your question? Thanks for the feedback There was a problem submitting your feedback. Please try again later.