
Set up email in Thunderbird / การตั้งค่าอีเมลในธันเดอร์เบิร์ด
After you have created an e-mail address in the CodeOrange Control Panel (my.codeorange.co.th) , you can then use this information to set up your Thunderbird to receive e-mail.
Required data :
Before you follow the steps, it is important that you have the following information at hand (which will be shown after you have created your address);
- E-mail address;
- E-mail user name;
- E-mail password;
- Incoming mail server;
- Imap or Pop3;
- Outgoing mail server;
- Port
Set up e-mail account step by step
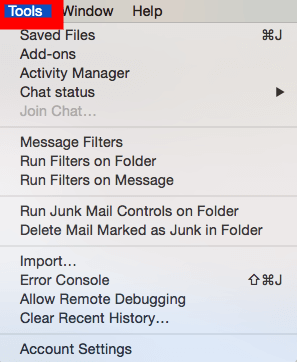
Step 1: Choose "Tools" and then "Account Settings";
Step 2 : Next choose "Add Mail Account" and then "Ok".

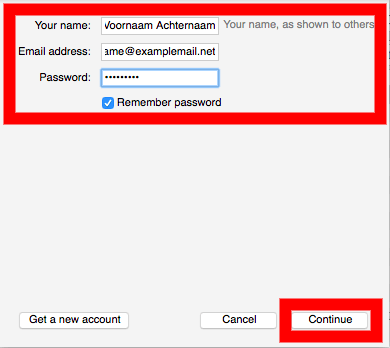
Step 3 : You will end up in the screen below. Where you can specify the following settings;1. Your Name : Enter the name for your new email account here;2. Email address : Enter the correct e-mail address here;3. Password : Enter the corresponding password here.If you have filled in the above you can choose " Continue ".
Step 4 : In the screen below extra possibilities are available for Imap and Pop .
- Do you want to use Pop? Then choose " Pop ";
- Do you want to use Imap? Then choose " Imap " (standard, recommended)
| IMAP: The e-mail remains on the server so you can access it from multiple devices.Pop: The e-mail is forwarded to your device. Does not remain on the server. |
The example below is based on " imap " (recommended).
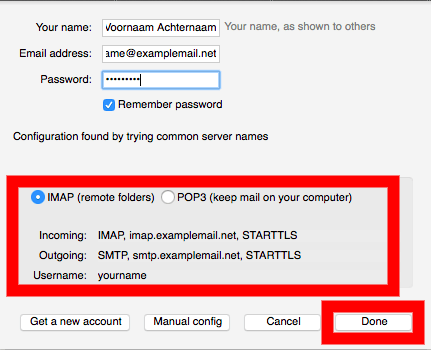
Step 5 : At the last step you can enter additional settings;
Incoming : IMAP
Server hostname (for incoming and outgoing): <SERVER>.codeorange.host (note: this can also be another server name that ends with codeorange.host, see overview settings after creating or changing address in the Control Panel)
Port : 143 for incoming and 587 for outgoing.
SSL : StartTLS
Authentication: Normal Password
When outgoing, enter " yourname.examplemail.net " ( note the point instead of the @ )
Then choose " Done ".

Your new email account has now been successfully created. You can now send and receive mail.
Thunderbird is in no way connected to CodeOrange, therefore CodeOrange does not support the use of Thunderbird outside of this manual
สำหรับภาษาไทยดังนี้
ข้อมูลที่ต้องการ
หลังจากที่ท่านได้ทำการสร้างอีเมลใน CodeOrange Control Panel (my.codeorange.co.th) แล้วท่านสามารถใช้ข้อมูลดังนี้เพื่อทำการตั้งค่าของธันเดอร์เบิร์ดของท่านเพื่อจัดการอีเมล
ข้อมูลที่ต้องการ :
ท่านควรเตรียมข้อมูลสำคัญให้พร้อมก่อนที่จะดำเนินตามขั้นตอนดังต่อไปนี้ (ซึ่งข้อมูลดังกล่าวจะถูกแสดงหลังจากที่ท่านได้ทำการสร้างอีเมลแล้ว)
- ที่อยู่อีเมล
- บัญผู้ใช้อีเมล
- รหัสผ่านอีเมล
- ชื่อเซิร์ฟเวอร์อีเมลขาเข้า
- ชื่อเซิร์ฟเวอร์อีเมลขาออก
- IMAP หรือ POP3
- หมายเลขพอร์ต
ขั้นตอนการตั้งค่าบัญชีอีเมล
ขั้นตอนที่ 1 : เลือกที่ "Tools" และให้ทำการเลือกที่ "Account Settings"
ขั้นตอนที่ 2 : เลือกที่ "Add mail Account" และให้ทำการเลือกที่ "Ok"
ขั้นตอนที่ 3 : ท่านจะเห็นหน้าจอตามรูปภาพดังกล่าว ซึ่งท่านสามารถเติมข้อมูลลงในช่องดังนี้
1. Your Name : กรอกชื่อของท่านสำหรับการสร้างบัญชีอีเมล
2. Email address : กรอกที่อยู่อีเมลของท่าน
3. Password : กรอกรหัสผ่านอีเมลของท่าน
หลังจากที่ท่านกรอกข้อมูลเรียบร้อยแล้ว ท่านสามารถเลือกที่ "Continue" เพื่อดำเนินการขั้นต่อไป
ขั้นตอนที่ 4 : ตามรูปทางด้านล่างสำหรับท่านที่ต้องการใช้ IMAP และ POP
หากท่านต้องการใช้ POP ให้ทำการเลือกที่ "POP
หากท่านต้องการใช้ IMAP ให้ทำการเลือกที่ "IMAP" (ค่าพื้นฐานที่เราแนะนำ)
| IMAP : อีเมลอยู่ในเซิร์ฟเวอร์ทำให้สามารถเข้าใช้งานได้จากหลายอุปกรณ์
POP : อีเมลจะถูกส่งไปยังอุปกรณ์ของท่าน ไม่ถูกเก็บไว้ในเซิร์ฟเวอร์ |
ตัวอย่างทางด้านล่างของการตั้งค่าด้วย "IMAP" (ค่าที่แนะนำ)
ขั้นตอนที่ 5 : ขั้นตอนสุดท้ายท่านสามารถตั้งค่าเพิ่มเติมได้ดังนี้
Incoming : IMAP
Server hostname (สำหรับกล่องรับเข้าและส่งออก): <SERVER>.codeorange.host (ชื่อของเซิร์ฟเวอร์จะลงท้ายด้วย codeorange.host ดูการตั้งค่าโดยรวมได้หลังจากที่ทำการสร้างหรือเปลี่ยนแปลงได้ใน Control Panel)
Port : 143 สำหรับ incoming และ 587 สำหรับ outgoing
SSL : StartTLS
Authentication: Normal Password
When outgoing, enter " yourname.examplemail.net " ( ใช้จุดแทน @ )
หลังจากนั้นเลือกที่ " Done "
เมื่อท่านตั้งค่าบัญชีอีเมลเรียบร้อยแล้ว ท่านสามารถใช้งานอีเมลได้ตามปกติ