
Set up email in Outlook 2016 / การตั้งค่าบัญชีอีเมลใน Outlook 2016
Required data
After you have created an e-mail address in the CodeOrange Control Panel (my.codeorange.co.th), you can use this information to set up your Office / Outlook to receive e-mail.
The server name for your domain can be found by re-storing the data of an e-mailbox in the Control Panel (without changes). Then you will see all the data including the server name.
Required information: Before you follow the steps, it is important that you have the following information at hand (which will be shown after you have created your address);
- E-mail address
- E-mail user name
- E-mail password
- Server for incoming e-mail
- Server for outgoing e-mail
- Imap or Pop3
Set up e-mail account step by step
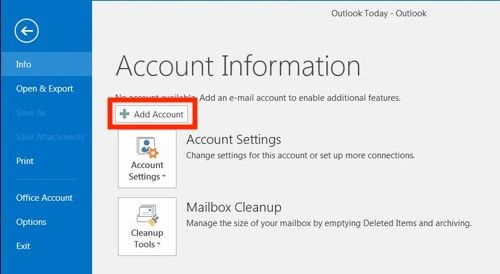
1. Open Microsoft Outlook and choose "File" and then go to "Add Account"
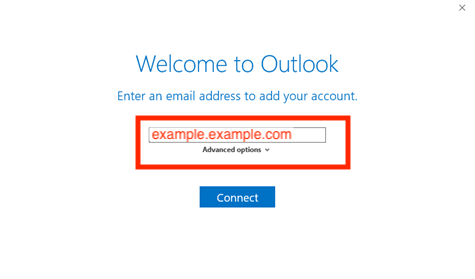
2. Put your email address, click "Advanced options and choose " Manually configure server settings or additional server types"
3. Choose IMAP or POP3
IMAP: The e-mail remains on the server so you can access it from multiple devices.
Pop: The e-mail is forwarded to your device. Does not remain on the server.
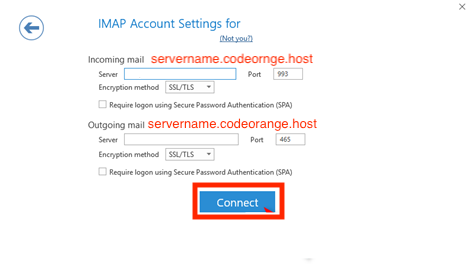
4. Put Incoming mail and outgoing mail
Incoming e-mail server: <SERVER NAME>.codeorange.host (note: replace < SERVER NAME > with the server name that ends with codeorange.host, see the settings overview after creating or changing address in the Control Panel)
Outgoing e-mail server: <SERVER NAME>.codeorange.host replace < SERVER NAME > with the server name that ends with codeorange.host, see the settings overview after creating or changing address in the Control Panel)
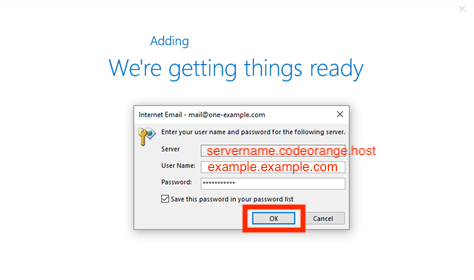
5. Put username and password with outgoing mail
*** Note: username of outgoing use '.' instead of '@'
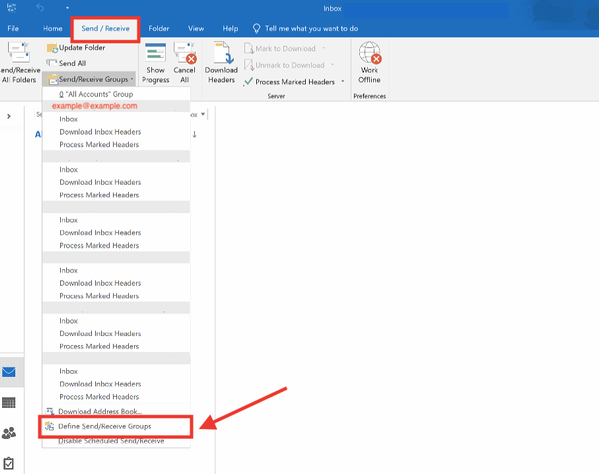
6. Go to Send/ Receive and click "Define Send/ Receive Groups
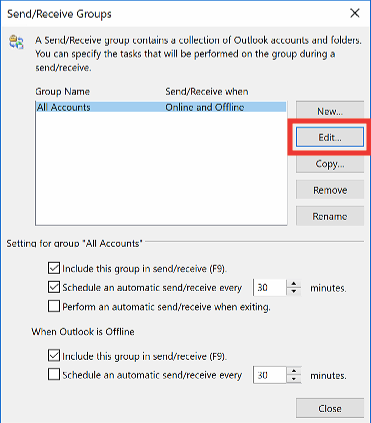
7. Click "Edit" to set email account
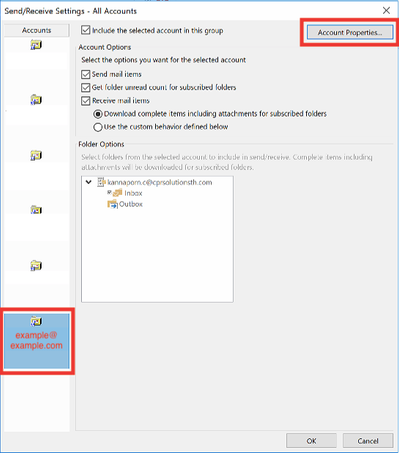
8. Choose email account and click "Account Properties"
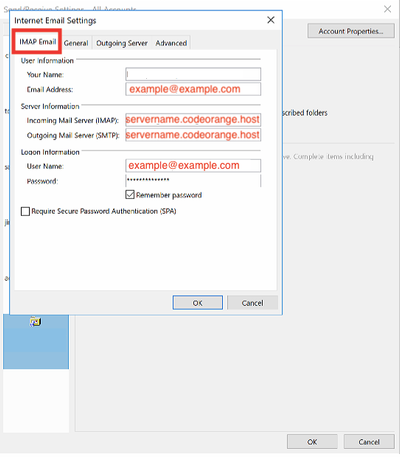
9. Go to IMAP Email and put information
Your name: your name for the mail account
Email address: your email
Incoming Mail Server (IMAP): <SERVER NAME>.codeorange.host
Outgoing Mail Server (SMTP): <SERVER NAME>.codeorange.host
User name: e-mail address can be filled in at username
Password: password is from your email account
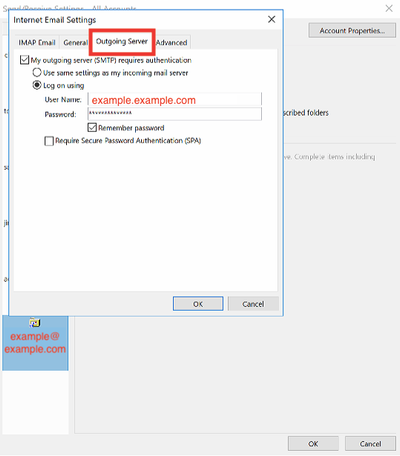
10. Go to Outgoing Server
User name: username of outgoing use '.' instead of '@'
Password: password is from your email account
11. Go to Advanced and fill "INBOX" in Root folder path

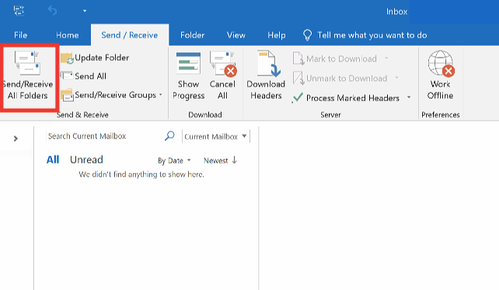
12. Click Send/ Receive All Folders to sync mail in mailbox
สำหรับภาษาไทย ดังนี้
ข้อมูลที่ต้องการ
หลังจากที่ท่านได้ทำการสร้างอีเมลใน CodeOrange Control Panel (my.codeorange.co.th) แล้วท่านสามารถใช้ข้อมูลดังนี้เพื่อทำการตั้งค่าของOfficeและOutlookของท่านเพื่อรับอีเมล
ชื่อเซิร์ฟเวอร์โดเมนของท่านสามารถหาได้จากการ re-storing ข้อมูลของกล่องอีเมลใน Control Panel ท่านสามารถดูข้อมูลต่าง ๆ ได้รวมทั้งชื่อเซิร์ฟเวอร์ได้
ข้อมูลที่ต้องการ :
ท่านควรเตรียมข้อมูลสำคัญให้พร้อมก่อนที่จะดำเนินตามขั้นตอนดังต่อไปนี้ (ซึ่งข้อมูลดังกล่าวจะถูกแสดงหลังจากที่ท่านได้ทำการสร้างอีเมล)
1. ที่อยู่อีเมล
2. บัญชีผู้ใช้อีเมล
3. รหัสผ่านอีเมล
4. เซิร์ฟเวอร์สำหรับอีเมลขาเข้า
5. เซิร์ฟเวอร์สำหรับอีเมลขาออก
6. IMAP หรือ POP3
ขั้นตอนการตั้งค่าบัญชีอีเมล
1 : เปิด Microsoft Outlook และทำการเลือกที่ "File" หลังจากนั้นไปยัง "Add Account"
2. กรอกอีเมลของท่าน คลิก "Advanced options และเลือก " Manually configure server settings or additional server types"
3. เลือก IMAP or POP3
IMAP: อีเมลอยู่ในเซิร์ฟเวอร์ ท่านจะสามารถเข้าใช้งานได้จากหลายอุปกรณ์
Pop: ข้อมูลต่าง ๆ ถูกส่งไปยังอุปกรณ์ทันที หากเข้าใช้ผ่านอุปกรณ์ชิ้นอื่นจะไม่สามารถได้รับอีเมลที่ถูกส่งออกไปแล้ว
4. กรอก Incoming mail และ outgoing mail
5. กรอก user name และ password ของoutgoing mail
โดย user name สำหรับ outgoing จะใช้ จุด แทน @
6. ไปที่ Send/ Receive และคลิก "Define Send/ Receive Groups"
7. คลิก "Edit" เพื่อตั้งค่าข้อมูล
8. เลือกอีเมลที่ต้องการตั้งค่า และคลิก "Account Properties"
9. ไปที่แถบ IMAP Email และกรอกข้อมูลดังนี้
Your name: ชื่อของท่าน
Email address: ชื่ออีเมลของท่าน
Incoming Mail Server (IMAP): <ชื่อเซิร์ฟเวอร์>.codeorange.host
Outgoing Mail Server (SMTP): <ชื่อเซิร์ฟเวอร์>.codeorange.host
User name: ใช้เป็นชื่ออีเมล
Password: รหัสผ่านตามที่ได้ตั้งค่าไว้
10. ไปที่แถบ Outgoing Server
User name: username ใช้เป็น จุด แทน @
Password: รหัสผ่านตามที่ได้ตั้งค่าไว้
หลังจากนั้นคลิก OK เพื่อตั้งค่า
11. ไปที่แถบ Advanced ตรงช่อง Root file path กรอก INBOX
12. คลิก Send/ Receive All Folders เพื่อ sync mail ใน mailbox
If you receive an error such as "Can't create data file outlook 365" use this manual method:
1) Open Outlook 2016
2) Click the File tab
3) Click on "Account Settings" and choose "Manage Profiles". Do not use "Add Account"
4) You may be asked if you want want this app to make changes. If so, click "Yes"
A new dialog box will open.
5) Close Outlook 2016
6) In that dialog box, choose "Email Accounts".
7) Go through the process of adding an IMAP account as normal, specifying everything you need to for your account (info can be found in Control Panel after saving the mailbox).