
Moving WordPress / การย้าย WordPress
In this article I explain step by step how to move a WordPress website from one hosting provider to another. It is useful if you are already familiar with FTP and a database management environment such as phpMyAdmin, but that knowledge is not required.
There are also WordPress plugins that can make a move easier, such as BackupBuddy. Or you can use our WordPress moving service, taking the whole process off your hands.
Summary steps:
- Download all files and the database of the current provider to your own computer
- Customize the database configuration
- Upload all files from your computer to the new provider
Download all website files to your own computer with an FTP program
Alternative: You can download a backup of your files via a Control Panel
1. You need the FTP data from your current provider. If you do not know them, you can often find them in an online Control Panel, or you can ask the helpdesk for the following information:
FTP Server name: .... (this is often your domain name, eg www.mydomainname.com or a servername)
FTP Username: ....
FTP Password: ....
This allows you to log in with an FTP program
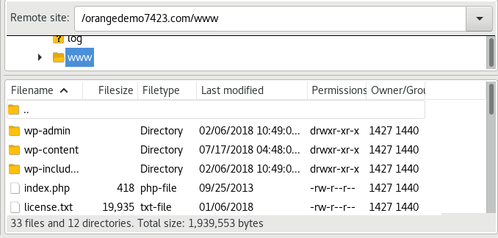
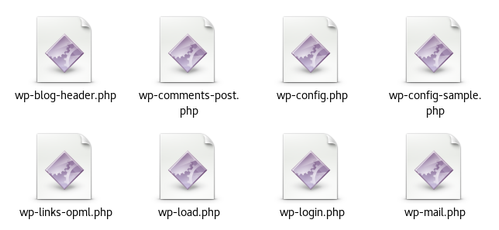
2. Navigate in your FTP program to the folder with WordPress. It is usually called something like "public_html" or "www". You can recognize it because it contains all kinds of wp files, such as wp-config.php, wp-includes, wp-content.
3. Downloading all files can take quite a long time
Adjust the configuration
1. For this you need to know which database name is used for this website, and the database login details of both your old and your new provider. If you do not know the details of your new provider , ask them. You then need:
Server address: .... (normally "localhost")
Database username: ....
Database password: ....
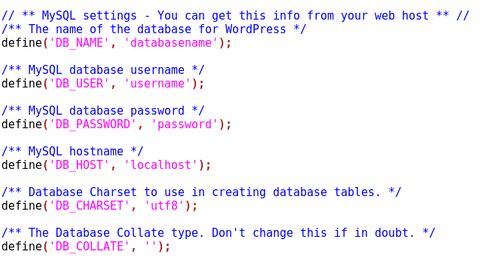
2. The current database data is set in the file "wp-config.php". If you have already downloaded the website files on your own computer, you can open the file wp-config.php in a text editor
3. You search for the line that looks like:
define ('DB_NAME', '<database name>');
Behind it is the name of the database mentioned in a few brackets. Below are 3 similar lines starting with DB_USER (username), DB_PASSWORD (password) and DB_HOST (server address).
4. You must now adjust these 3 (or 4) values with the data of the new provider. First make a note of the current values. Then change the data to that of the new provider and then save the file
Upload all files to the new provider with an FTP program
1. Now, you need the FTP data of your new provider. With us you will receive it for example by e-mail after ordering a hosting package. If you do not know them, you can often find them or reset them in an online Control Panel, or you can ask the help desk for the following information:
FTP Servername: .... (this is usually your domain name, eg www.mydomainname.com)
FTP Username: ....
FTP Password: ....
2. After you have made a connection you navigate on the right side to the folder where your public website files are located, often "www" or "public_html". That folder should still be empty, or there is only an index.html file. If it is there, you can first delete index.html or index.htm.
3. On the left side of your computer, navigate to the folder containing the WordPress files that you downloaded in first time. Now drag all files (including all folders such as wp-admin) from that folder to the right in the www or public_html folder. The upload will take a while.
Tip: Check for certainty that all folders and files have come along. The file list must therefore match the files that you saw with your old provider
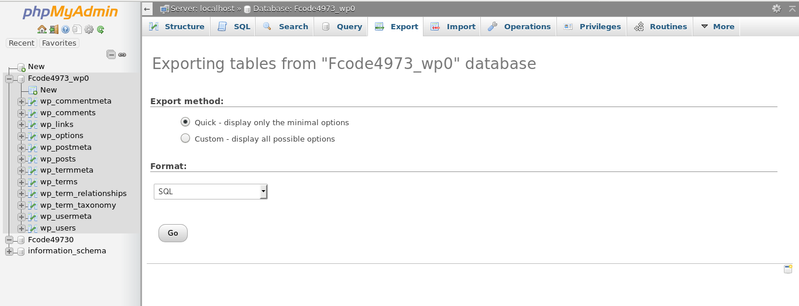
Download a backup of the database via phpMyAdmin
1. You now need the database management environment (almost always phpMyAdmin) from your current provider. Log in to phpMyAdmin (at the old provider) with the original username and password. Often you can only reach phpMyAdmin via an online Control Panel (eg Cpanel, Plesk).
2. Click in the left menu on the name of the database. If you see a few tables like wp_comments, wp_commentmeta, (wp_ can also be any other prefix).
3. Choose Export at the top and then you can click Go directly to download a backup to your computer.
4. Save the file to your computer.
Import the database from the new provider with phpMyAdmin
1. Go to phpMyAdmin with new provider, log in with the new database.
2. Click on the name of the database that you filled in with DB_NAME. If it is good, this database is still empty. If not, be careful not to overwrite an existing database from another website
3. Click Import and choose Browse at the top (select) to select the database file you downloaded. Then choose Go at the bottom, and unless you have a very large database, it should be ready to import in a few minutes
Now, You are ready to transfer. If your provider has given a temporary URL, you can do a quick check to see if your website is working there (highly recommended). Then you can start moving your domain to the new provider.
สำหรับคู่มือภาษาไทยมีดังนี้
สำหรับขั้นตอนการย้ายเว็บไซต์จากผู้ให้บริการหนึ่งไปยังอีกผู้ให้บริการหนึ่ง ท่านสามารถใช้ความรู้ทางด้าน FTP และการจัดการฐานข้อมูล เช่น phpMyAdmin ได้ และสำหรับ WordPress ยังมีปลั๊กอินที่จะช่วยให้ท่านทำงานได้ง่ายยิ่งขึ้น เช่น BackupBuddy
สรุปขั้นตอนในการทำได้ดังนี้
- ดาวน์โหลดไฟล์ และฐานข้อมูลทั้งหมดจากผู้ให้บริการโฮสติ้งปัจจุบันที่ท่านใช้งานอยู่ลงในเครื่องคอมพิวเตอร์ของท่าน
- จัดการตั้งค่าฐานข้อมูล
- อัพโหลดไฟล์ทั้งหมดในเครื่องคอมพิวเตอร์ของท่านไปยังผู้ให้บริการใหม่
ดาวน์โหลดไฟล์ลงเครื่องคอมพิวเตอร์ของท่านผ่านทาง FTP
อีกทางเลือกหนึ่งท่านสามารถดาวน์โหลดไฟล์ผ่านทาง Control Panel ได้
1. ท่านต้องมีข้อมูลของ FTP จากผู้ให้บริการปัจจุบันของท่าน โดยสามารถค้นหาได้ใน Control Panel หรือติดต่อฝ่ายซัพพอร์ตเพื่อขอข้อมูลในการเข้าสู่ระบบ FTP ดังนี้
FTP Server name: .... (โดยส่วนใหญ่จะใช้เป็นชื่อโดเมน หรือชื่อเซิร์ฟเวอร์ เช่น www.mydomainname.com)
FTP Username: ....
FTP Password: ....
2. ในโปรแกรม FileZilla โฟลเดอร์ของ WordPress โดยส่วนใหญ่จะมีชื่อว่า "public_html" หรือ "www" ซึ่งในโฟลเดอร์นั้นจะประกอบด้วยไฟล์ wp ประเภทต่างๆ เช่น wp-config.php, wp-includes, wp-content
3. ดาวน์โหลดไฟล์ทั้งหมด
จัดการตั้งค่าฐานข้อมูล
1. ท่านต้องทราบชื่อฐานข้อมูลของเว็บไซต์ และบัญชีผู้ใช้งานของทั้งผู้ให้บริการรายเก่า และผู้ให้บริการรายใหม่ ซึ่งข้อมูลที่ต้องการมีดังนี้
Server address: .... (โดยปกติจะชื่อ "localhost")
Database username: ....
Database password: ....
2. ฐานข้อมูลปัจจุบันจะถูกตั้งค่าอยู่ในไฟล์ "wp-config.php" เมื่อท่านดาวน์โหลดไฟล์ลงเครื่องคอมพิวเตอร์ของท่านเรียบร้อยแล้ว ท่านสามารถเปิด และแก้ไขไฟล์ wp-config.php ได้ใน text editor
3. ค้นหาบรรทัด
define ('DB_NAME', '<database name>');
ในวงเล็บจะเป็นชื่อฐานข้อมูล ซึ่งจะมีบรรทัดที่คล้ายกันอยู่อีก 3 บรรทัด ได้แก่ DB_USER (บัญชีผู้ใช้) DB_PASSWORD (รหัสผ่าน) และ DB_HOST (หมายเลขไอพีของเซิร์ฟเวอร์)
4. ท่านสามารถแก้ไขการตั้งค่าสำหรับผู้ให้บริการรายใหม่ได้โดยการบันทึกค่าเดิมของผู้ให้บริการรายเก่าเก็บไว้ก่อนจะทำการแก้ไขข้อมูลให้เป็นข้อมูลของผู้ให้บริการรายใหม่
อัพโหลดไฟล์ทั้งหมดในเครื่องคอมพิวเตอร์ของท่านไปยังผู้ให้บริการใหม่
1. ท่านต้องมีข้อมูล FTP ของผู้ให้บริการรายใหม่ ซึ่งท่านสามารถค้นหาได้ใน Control Panel หรือติดต่อฝ่านซัพพอร์ตเพื่อสอบถามข้อมูลดังนี้
FTP Servername: .... (โดยส่วนใหญ่จะใช้เป็นชื่อโดเมน เช่น www.mydomainname.com)
FTP Username: ....
FTP Password: ....
2. หลังจากที่ท่านเชื่อมต่อเรียบร้อยแล้ว ทางด้านขวามือจะปรากฎโฟลเดอร์ของเว็บไซต์ โดยส่วนใหญ่จะชื่อว่า "www" หรือ "public_html" ซึ่งควรจะเป็นโฟลเดอร์ว่าง หากมีไฟล์ index.html อยู่ให้ท่านลบไฟล์นั้นก่อน
3. ทางด้านซ้ายของหน้าจอ ให้ท่านค้นหาโฟลเดอร์ที่เก็บไฟล์ที่ท่านดาวน์โหลดไว้ และลากไฟล์ทั้งหมดมาวางในโฟลเดอร์ www หรือ public_html ทางด้านขวา
ท่านสามารถตรวจสอบความถูกต้องของไฟล์และโฟลเดอร์ได้ โดยไฟล์และโฟลเดอร์นั้นจะต้องตรงกับไฟล์และโฟลเดอร์ที่อยู่ในผู้ให้บริการรายเก่า
ดาวน์โหลดฐานข้อมูลสำรองผ่านทาง phpMyAdmin
1. ท่านต้องมีข้อมูลของการจัดการฐานข้อมูลของผู้ให้บริการเก่า (โดยส่วนใหญ่จะใช้ phpMyAdmin) ให้ท่านเข้าสู่ระบบของ phpMyAdmin ของผู้ให้บริการรายเก่า
2. เลือกฐานข้อมูลที่ต้องการทางเมนูด้านซ้าย จะแสดงตารางในฐานข้อมูลนั้น เช่น wp_comments, wp_commentmeta หรือ ตารางอื่นๆ ที่ขึ้นต้นด้วย wp_
3. คลิกเลือก Export ทางด้านบน และคลิก Go เพื่อดาวน์โหลดข้อมูลลงยังเครื่องคอมพิวเตอร์ของท่าน
4. บันทึกไฟล์ลงในเครื่องคอมพิวเตอร์ของท่าน
การนำเข้าฐานข้อมูลของผู้ให้บริการใหม่ผ่านทาง phpMyAdmin
1. เข้าสู่ระบบ phpMyAdmin ของผู้ให้บริการรายใหม่
2. คลิกเลือกชื่อฐานข้อมูลที่ท่านได้ตั้งค่าไว้ใน DB_NAME หากฐานข้อมูลนั้นมีข้อมูลอยู่ท่านต้องระวังไม่เขียบทับข้อมูลที่มีอยู่
3. คลิก Import และ Browse จากแถบด้านบน เลือกไฟล์ฐานข้อมูลที่ท่านดาวน์โหลดไว้ และคลิก Go
เมื่อทำตามขั้นตอนด้านบนเรียบร้อยแล้ว ท่านสามารถโอนย้ายเว็บไซต์ได้ หากท่านมี URL สำรองที่ได้จากผู้ให้บริการของท่าน ท่านสามารถตรวจสอบการทำงานของเว็บไซต์ให้ถูกต้อง (แนะนำให้ตรวจสอบ) หลังจากนั้นท่านสามารถเริ่มการโอนย้ายโดเมนมายังผู้ให้บริการรายใหม่ได้